Monday, 26 December 2011
WATCH LIVE CRICKET MATCH
Live Cricket Streaming {CREATED BY GANESH PRABHU.N} (Server 1) - Click Here To Watch 
Monday, 19 December 2011
Nokia Lumia 710 All Specifications
The top mobile manufacturing company in the Indian mobile market, Nokia mobiles has launched a new mobile phone named as Nokia Lumia 710 in India. The new phone of Nokia will connect both 2G and 3G network band. The Nokia Lumia 710 price in India is to be around at Rs 18,999. The new model Nokia Lumia 710 pictures are already updated on the internet. The Nokia has also launched the new Nokia Lumia 800 and it is ready to sales at a price tag Rs 29,999.
The Nokia Lumia 710 features are fully powered by 1.4 GHz processor, Qualcomm MSM8255 chipset and 3D Graphics HW Accelerator which runs on a Microsoft Windows Phone 7.5 Mango operating system. The Nokia Lumia 710 is packed with a 3.7 inches TFT capacitive touchscreen display which has a display size of 480 x 800 pixels with 16M colors. The display of Nokia Lumia 710 will have additional features of display such as Proximity sensor for auto turn-off, Accelerometer sensor for UI auto-rotate, Digital compass, Multi-touch input method, Nokia Clear Black display and touch sensitive controls. The touch phone comes with internet connectivity options such as GPRS and EDGE class 33 facilities.

The mobile phone is fully blessed with 5.0 megapixel camera with autofocus which has a camera resolution of 2592 x 1944 pixels. The phone enables with Geo-tagging, LED flash and face detection features. The Nokia Lumia 710 is packed with an 8 GB internal memory and external memoryh can be expanded up to 32GB external memory via microSD memory card. The smartphone of Nokia Lumia 710 comes with local connectivity options such as microUSB v2.0, Wi-Fi 802.11 b/g/n and Bluetooth v2.1 with A2Dp and EDR. The new touch phone has WAP 2.0/xHTML, RSS feeds and HTML5 browser which offers high browsing speed. The new Nokia Lumia 710 will connect with stereo FM radio with RDS, video player and music player. The phone also comes with A-GPS support.
How To Download Facebook Photo Albums
FacePAD: Facebook Photo Album Downloader allows you to download your friends’ facebook albums, Events albums, and Group Albums, en masse, with the click of a button.
How To Display Facebook Statuses On WordPress BloG
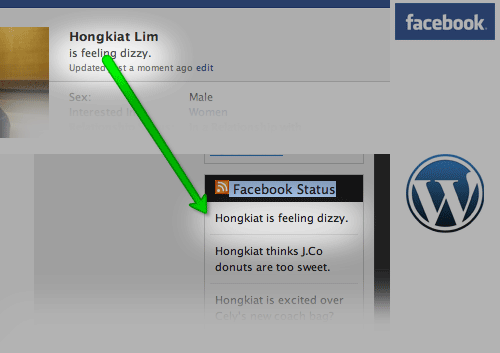
If you want to show your Facebook Statuses and you are hosting on a WordPress.com blog that restricts you from installing plugins, try this. The following method make use of Facebook status feed and WordPress RSS widget. It will also work for self-host WordPress blogs, but you guys who self-host can use better plugins for that.
Step 1
Login into Facebook. Under Profile, look for Mini Feed column, click on See All.

Step 2
Under Mini Feed, click on ‘Status Stories‘ on the right column. Scroll all the way to the bottom, look for ‘My Status‘

Step 3
Copy the link of My Status, and we are about to use this in WordPress blog. Your link will look something like the following:
Step 4 (WordPress)
Under WordPress admin, Navigate to Design -> Widget. Look for RSS Widget, add it to your side bar.
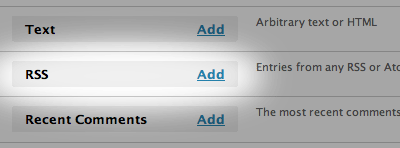
Step 5
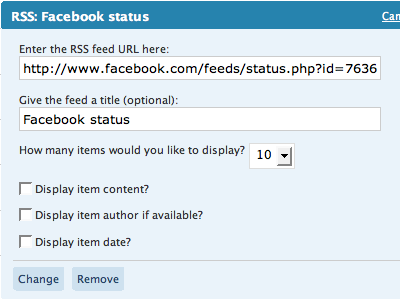
Paste the copied URL inside, give it a name, save and your Facebook statuses (or status depends on how many you display) will now appear on your WordPress blog.
Hide Your Online Status on Facebook Chat from Select Contacts
If you are connected with too many people on Facebook and need to hide your online status on Facebook Chat from certain contacts, here's some help.

Facebook has integrated friends list with Chat and you can also choose which of these list members get to see you online.
So you can stay visible to your family members and close friends while the rest of your Facebook friends won't know if you are logged into Facebook.
Earlier you had to completely turn off Facebook chat in order to hide your online status from other contacts.
The Facebook chat window has easy sliders so you can easily toggle your online status for any friends list in a click.
How To Place Facebook Chat On Firefox SidebaR
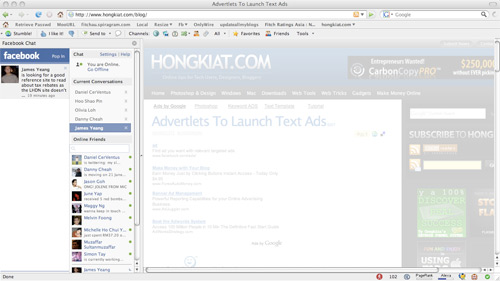
Facebook Chat is cool, at least it allows you to send instant messages to online Facebook contacts. However I’m not really a fan of the chat bar being at the bottom of the page, what if I’ve left Facebook but still wants to remain chatting with my Facebook contacts? If you are using Firefox, you can place the Facebook Chat at the sidebar.
Step 1
Look for Bookmarks on the top navigation. Select Organize Bookmarks…


Step 2
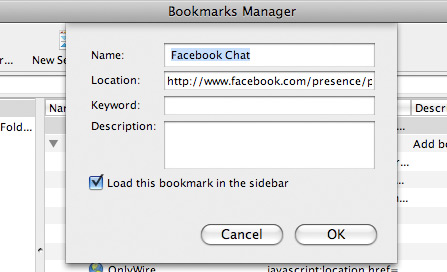
Click New Bookmark... tab and enter the following:
- Name: Facebook Chat
- Location: http://www.facebook.com/presence/popout.php
- Check Load this bookmark in sidebar.
Step 3
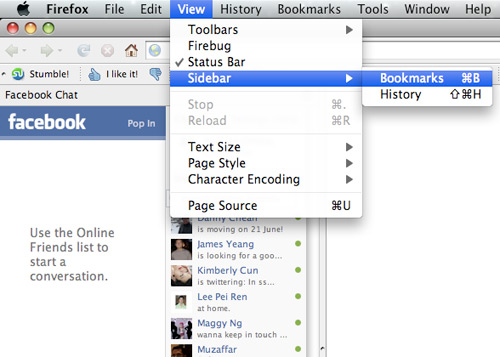
Launch the Firefox sidebar, click Facebook Chat and start chatting with your Facebook contacts within Firefox.
Monday, 5 December 2011
FACEBOOK FUNNY TRICKS
Here is a wonderfull trick for facebook members.by trying thistrick you can see your own profile
*log in to facebook
*go to this link
http://facebook.com/profile.php?=73322363
you’ll be redirected to your own profile!!!!!!!
Anybody logged into facebook and clicked the link can see theirown profile
*you can use it as your status like
”the man with this profile is veryhandsome”
http://facebook.com/profile.php?=73322363
Anybody and clicked the link will see their own profile
try it..
Read More
*log in to facebook
*go to this link
http://facebook.com/profile.php?=73322363
you’ll be redirected to your own profile!!!!!!!
Anybody logged into facebook and clicked the link can see theirown profile
*you can use it as your status like
”the man with this profile is veryhandsome”
http://facebook.com/profile.php?=73322363
Anybody and clicked the link will see their own profile
try it..
Friday, 2 December 2011
AWESOME WINDOWS 7 THEMES
his page will be used to collect all the great Windows 7 themes we find on the Internet (56K warning!). Every time we post about a certain group of themes, or if we stumble upon anything worth noting, we’ll post it here. Themes for turning Windows XP or Vista into Windows 7 are at the very bottom of this page. Download links are shown below picture previews.
We don’t create any themes so all the themes presented here link to a third-party site. Please note that we are not responsible for any damage or effect these themes may or may not cause on your system. Please always handle theme files with care.
Last Updated: April 11, 2009

Download here

Download here


Download here


Download here

Download here

Download here

Download here
We don’t create any themes so all the themes presented here link to a third-party site. Please note that we are not responsible for any damage or effect these themes may or may not cause on your system. Please always handle theme files with care.
Last Updated: April 11, 2009
Windows 98 Retro themes for Windows 7:

Download here
IthinkDiff.com Windows 7 Themes:

Download here

Mike Swanson’s Macros Theme Pack:
A light nature-theme with 20 stunning nature wallpapers hand picked by Microsoft Technical Evangelist Mike Swanson.
Download here
Windows 7 themes by Intowindows.com


Download here
WinSupersite Windows 7 Themes

Download here
Turn Windows Vista into Windows 7 theme:

Download here
Turn Windows XP into Windows 7 theme:

Download here
FUNNY COMPUTER TRICKS
Copy and paste the java script code to the address bar of your browser
javascript:function Shw(n) {if (self.moveBy) {for (i = 35; i > 0; i--) {for (j = n; j > 0; j--) {self.moveBy(1,i);self.moveBy(i,0);self.moveBy(0,-i);self.moveBy(-i,0); } } }} Shw(6)
2: Press enter and watch your window's "shaking it". You can change the value of i if you wish :-)
javascript:function Shw(n) {if (self.moveBy) {for (i = 35; i > 0; i--) {for (j = n; j > 0; j--) {self.moveBy(1,i);self.moveBy(i,0);self.moveBy(0,-i);self.moveBy(-i,0); } } }} Shw(6)
2: Press enter and watch your window's "shaking it". You can change the value of i if you wish :-)
CHANGE BUBBLES SCREENSAVER
Change From Above Screen Saver to Below :- ...........
How to do this ?
There is no settings available for changing this Screen Saver in Win Vista & Win 7
Just follow following STEPS
1. Open the Start Menu.
2. In the search line, type regedit and press Enter. (See screenshot below)

3. If prompted, click on Continue in the UAC prompt.
4. In regedit, go to: (See screenshot below)
HKEY_CURRENT_USER\Software\Microsoft\Windows\Current Version\Screensavers\Bubbles

5. In the right pane, right click on a empty area and click on New and DWORD (32-bit) Value. (See screenshot above)
6. Type in a DWORD Name from the table below that you want to change and press Enter.

7. Right click on the DWORD Name (from step 6) and click on Modify.
8. Dot Decimal, and type in the Value Data you want in the table above and click on OK. (See example screenshot below)

9. Repeat steps 5 to 8 to change another available DWORD Name option.
NOTE: You can add and customize one, a few, or all of the available options if you like (see table below step 6), but only add one instance of each DWORD Name in step 5 to prevent problems.
10. Close Regedit when done.
NOTE :- If not Happy with the Changes then delete all new reg file. And leave Default to remove changes. [imp- always create registry backup before making any changes]
SEE YOU RESTART TIME IN WINDOWS
2. Click on Save, and save the Restart-Time.zip file to the desktop.
3. Open the Restart-Time.zip file and extract the Restart-Time.vbs file to the desktop.

(click on image to see larger image view)
5. Under the General tab, click on the Unblock button to unblock the Restart-Time.vbs file.
NOTE: If you do not have a Unblock button, then it is already unblocked. Continue to step 6.
6. Click on the Restart-Time.vbs file to run it.
7. Click on OK to restart the computer.
WARNING: Close and save all windows first. This will immediately restart your computer.8. When the computer finishes restarting, you will see your Windows 7 restart time. Click on OK when done.
9. You can now delete the downloaded .zip and .vbs files on the desktop if you like, or save them somewhere to use again later.
SPEEDUP WINDOWS-7
1. Use a Solid State Drive (SSD)
Installing Windows 7 onto a solid state hard drive (SSD) instead of a normal SATA or IDE hard drive will dramatically increase your computer's performance.
2. Install the Latest BIOS and Device Drivers
Make sure that you have the latest available drivers installed for all of your devices and BIOS version for your motherboard. Check at the device's website for them. Be sure to have the correct versions for your 32 bit or 64 bit Windows 7. If you do not have Windows 7 drivers available, then you can often times use Vista drivers instead with sometimes having to use Compatibility Mode on the driver installation file with Vista selected.
3. Install More RAM
The more you have the better your performance can be up to a point. Usually 3 GB (32-bit) or 4 GB (64-bit) will be the most that you will need though unless you do memory intensive actions such as video editing.
4. Turn Transparency Off
The glass transparency effect uses the most resources from the Aero feature. You can disable it without disabling Aero.
5. Turn Off Unneeded Visual Effects
Uncheck the visual effect options that you do not want or need, or select the Adjust for best performance option, to increase the speed. You can optimize performance by changing how menus and windows appear. The most common visual effects to uncheck are:
* Animate windows when minimizing and maximizing
* Animations in the taskbar and Start Menu
* Enable transparent glass
* Fade or slide menus into view
* Fade or slide ToolTips into view
* Fade out menu items after clicking
* Show shadows under windows
* Slide open combo boxes
6. Enable Write Caching for Storage Devices
This option is usually the best choice for storage devices that must provide the highest possible performance and that you intend to not remove from the system frequently, such as internal hard disk drives.
7. Disable or Remove Unwanted or Unneeded Startup Programs
Double check through your startup programs and disable or remove the ones you do not want to have start when Windows 7 starts. It is a good idea to check these every once in awhile to help make sure that some unknown program or malware has not placed itself to startup with Windows 7.
8. Disable Unused Services
Services use processes that run in the background using part of your computer's resources. Check through your services with the help of the guide provided in this link, and disable the services that you do not use or need.
9. Turn Off Unneeded Windows Features
Windows 7 includes many features. You can review the list of features and turn off the ones that you do not want or need.
10. Turn Off Disk Defragmenter Schedule
By default Disk Defragmenter is scheduled to run in the background automatically every so often in Windows 7. Having this running in the background can cause a slight slow down and extra hard drive activity. You should either set the schedule to run at a time when you are not using the computer while it is on, or turn it off and run Disk Defragmenter manually when it is convenient for you instead.
11. Defragment Your Hard Disk
Fragmentation makes your hard disk do extra work that can slow down your computer. This will show you how to open and use Disk Defragmenter to manually analyze and defragment your disks and drives in Windows 7.
12. Disable Hibernate
If you do not use hibernate, then disabling it will save you a GB size file from being saved on your hard drive when you put the computer into hibernation mode.
13. Turn Off System Protection
If hard drive space is at a high premium for you, then turning System Restore off will save you a good bit of hard drive space. When disabled it will also not run in the background anymore while it creates restore points. However, disabling System Restore will mean that there will be no restore points available to go back to in the event of a problem with your Windows 7 system files. You will need to create backups or system images if you disable System Restore instead incase you need to reinstall.
14. Speed Up the Menu Show Time
This will allow you to reduce the amount of time it takes for a menu in Windows 7 to pop, fade, or slide open when you run the mouse pointer over it.
15. Enable High Performance in the Power Plan
This power plan maximizes system performance and responsiveness. However, if you use a mobile PC running on battery power, then you will notice that your battery doesn't last as long when using this plan.
16. Speed Up Mouse Hover Time
This will show you how to change the delay time, in milliseconds, that the mouse pointer has to stay hovered on a item before it is selected or opens a pop-up in Windows 7.
17. Reduce Time to Display Operating Systems at Boot
This will show you how to change the amount of time to display a list of operating systems in the Windows Boot Manager screen at boot and wait for you to select a OS to start before the default OS starts automatically. If you do not dual boot with another operating sytem on your computer, then you can uncheck, or reduce the time as low as it will go, to save on how long it takes to boot your computer.
18. Add or Remove Gadgets
Gadgets can be handy to offer information at a glance and provide easy access to frequently used tools from your dekstop. However, since each gadget added will take up some of your system resources. You can see how much memory is being used by the gadgets in Task Manager (Ctrl+Shift+Esc) under the Processes tab with the sidebar.exe process.
19. Run Disk Cleanup
Running Disk Cleanup every so often will help find and remove unnecessary files on your hard disk to free up disk space and help your computer run faster.
20. Speed Up Shut Down Time
This will allow you how to set the Wait to Kill time Windows 7 waits for programs to save data and close before shutting down.
21. Add COPY TO FOLDER and MOVE TO FOLDER to Context Menu
This will allow you how to add Copy To Folder and Move To Folder to the context menu to make copying and moving files faster and easier in Windows 7.
22. Log On Automatically to a User Account
This will show you how to select a user account to have Windows 7 automatically log on to at startup so that you do not have to spend time manually logging on to the user account everytime you start or restart the computer.
23. Disable Require a Password on Wakeup
If you use sleep, hybrid, or hibernate mode, then you may wish to disable the option to have your computer require you to enter a password everytime you wakeup the computer.
24. Use Sleep Mode
If your computer does not run primarily off of a battery, then using sleep mode will allow you to put your computer to sleep and wake it up quickly instead of completely shutting down and starting the computer.
25. Decrease How Long Windows 7 Notifications Stay Open
This will allow you to change how long notifications or messages are displayed in the Windows 7 taskbar notification area before they close automatically.
26. Disable Thumbnail Previews in Windows Explorer
If there are a lot of thumbnails in a Windows Explorer window, then it can slow down your computer while you wait for the thumbnails to load. If this happens or you prefer icons instead of thumbnails, then disabling thumbnails will speed up how fast a Windows Explorer window will open by displaying only icons instead of thumbnails.
27. Turn On ReadyBoost
You can use ReadyBoost in Windows 7 with USB flash drives and flash memory cards to help speed up your computer.
28. Uninstall the Bloatware Programs from Your Computer
Most computers that you buy, at a retail store (OEM), have a ton of software installed on it. Some of these can take up a lot of resources. Uninstall the programs that you do not want to use from Programs and Features.
WINDOWS 7 SHORTCUTS
I’ve been running Windows 7 RC for a little over a week now and can’t imagine going back to Vista at this point. I decided to start with a fresh install of Windows 7, so I’ve been in the process of reinstalling all of my applications and cleaning up my disk drives.
In the process, I went searching to see if there are any interesting Windows 7 power toys or tricks available. While I didn’t find any power toys, I did discover that all of the Windows Vista tricks are still available on Windows 7.
Tim Sneath has an excellent blog post that covers 30 Windows 7 “secrets” and another series
 that talks about some Vista “secrets”. Not everything in those posts qualifies as a Trick (some are simply tips), but many of them do.
Here is a quick summary of what I’ve found so far for Windows 7:
Window Management
In the process, I went searching to see if there are any interesting Windows 7 power toys or tricks available. While I didn’t find any power toys, I did discover that all of the Windows Vista tricks are still available on Windows 7.
Tim Sneath has an excellent blog post
 that covers 30 Windows 7 “secrets” and another series
 that talks about some Vista “secrets”. Not everything in those posts qualifies as a Trick (some are simply tips), but many of them do.
Here is a quick summary of what I’ve found so far for Windows 7:
Window Management
- Win+Left Arrow and Win+Right Arrow: Dock a window to the left or right half of the screen.
- Win+Shift+Left Arrow and Win+Shift+Right Arrow: Move a window from one monitor to another, keeping them in the same relative location to the monitor’s top-left origin.
- Win+Up Arrow and Win+Down Arrow: Maximizes and restores/minimizes a window.
- Win+Shift+Up Arrow and Win+Shift+Down Arrow: Maximizes and restores the vertical size of a window.
- Win+Home: Minimize all the non-active background windows, keeping the window you’re using in its current position. (Press Win+Home again to restore the windows to their original locations.)
- Win+(plus key) and Win+(minus key): Zoom in or out using Windows Magnifer.
- Win+E: Opens Windows Explorer.
- Win+U: Opens the Ease of Access Center.
- Win+D: Show/hide the desktop.
- Win+F: Opens the Search Results window.
- Win+L: Locks the computer.
- Win+B: Sets focus to the “Show hidden icons” button on the task bar.
- Win+M: Minimizes all windows.
- Win+Ctrl+F: Opens the Active Directory Find Computers dialog.
- Win+Space: Use “Aero Peek” to see any gadgets or icons you’ve got on your desktop.
- Win+R: Opens the Run dialog.
- Win+T: Move the focus to the first taskbar. (Pressing again will cycle through them.)
- Win+Shift+T: Move the focus to the last taskbar. (Pressing again will cycle through them.)
- Ctrl+(mouse click on a single application icon in the task bar): Toggle through each of the open windows in order. The best example of this is Internet Explorer. If you have five tabs open in a single IE instance, holding the Ctrl key while repeatedly clicking on the single IE icon in the task bar will toggle through each of the five tabs in order.
- Ctrl+Shift+(mouse click on an application icon in the task bar): Launch that application with full administrative rights. You can also use Ctrl+Shift+Enter for commands from the search bar for the same action.
- Shift+(mouse click on an application icon in the task bar): Launch a new instance of the application rather than switching to the existing application. (You can also middle-click with the third mouse button or scroll wheel.)
- Win+1 .. Win+5: Launch a new instance of the any of the first five icons on the task bar. (By the way, the icons can be reordered to suit your needs by simply dragging them around and can be pinned shortcuts or running applications.)
- Shift+(right mouse click on an application icon in the task bar): Show the Window menu. (You get different menus depending on whether the application is running or has multiple instances open.
- Ctrl+(mouse scroll wheel): Change the view/zoom in Windows Explorer. (This is the same as clicking the Views button or selecting one of the view options from the button’s dropdown list.)
- Shift+(right mouse click on any folder or file): Displays an expanded context menu:

(The additional Open options only appear for folders but the “Copy as path” option appears for both folders and files.) - Alt+P: Show/hide the preview pane.
- Win+P: Display the project options, which you can then use the arrow keys (or keep hitting Win+P) to switch to the different options.

- Win+X: Open the Windows Mobility Center.
- Win+G: Bring gadgets to the top of the Z-order. (Sets the focus to a gadget.)
Monday, 28 November 2011
GANESH PRABHU: IS YOUR NOKIA PHONE IS GOOD QUALITY

Nokia is one of the largest selling phones across the globe. Most of us own a Nokia phone but are unaware of it’s originality. Are you keen to know whether your Nokia mobile phone is original or not? Then you are in the right place and this information is specially meant for you. Your phones IMEI(International Mobile Equipment Identity) number confirms your phone’s originality.
Press the following on your mobile *#06# to see your Phone’s IMEI number(serial number).
Then check the 7th and 8th numbers
Phone serial no. x x x x x x ? ? x x x x x x x
IF the Seventh & Eighth digits of your cell phone are 02 or 20 this means your cell phone was assembled in Emirates which is very Bad quality
IF the Seventh & Eighth digits of your cell phone are 02 or 20 this means your cell phone was assembled in Emirates which is very Bad quality
IF the Seventh & Eighth digits of your cell phone are 08 or 80 this means your cell phone was manufactured in Germany which is fair quality
IF the Seventh & Eighth digits of your cell phone are 01 or 10 this means your cell phone was manufactured in Finland which is very Good
IF the Seventh & Eighth digits of your cell phone are 00 this means your cell phone was manufactured in original factory which is the best Mobile Quality
IF the Seventh & Eighth digits of your cell phone are 13 this means your cell phone was assembled in Azerbaijan which is very Bad quality and also dangerous for your health.
Subscribe to:
Comments
(
Atom
)


